Wednesday, May 25, 2011

A WALK ON THE ANIMATION

Animating a walk can be a challenge for any animator. They become much easier when we keep in mind a few important elements, such as: EMOTION, WEIGHT, and strong KEY POSES. Of course these ingredients are important to any form of animation - 2D or 3D.
The element we begin with is EMOTION, Ask yourself...  WHO IS YOUR CHARACTER?...WHAT IS HE, SHE OR IT'S EMOTIONAL STATE OF MIND?... WHERE ARE THEY GOING?...WHERE ARE THEY COMING FROM?...AND WHY?
EMOTION affects EVERY aspect of the walk.
The GREATER the emotional weight...the GREATER the physical weight.
An ANGRY walk should be forceful and have more weight.. A SAD or DEPRESSED walk will display more weight but be more sluggish and seem closer to the ground. During a HAPPY or JOYOUS walk the character will seem lighter and his movements freer and further from the ground. Knowing the EMOTION of the character is the first step of any walk.
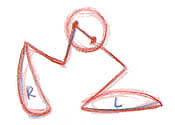
Some examples of EMOTIONS. (Note the WEIGHT differences)
WEIGHT is the next ingredient of a walk! Again, THE GREATER THE EMOTIONAL WEIGHT...THE GREATER PHYSICAL WEIGHT
WEIGHT can be shown in the FEET...LEGS and BODY. Specifically, SQUASHING the FEET, the QUADRICEPS and the BELLY can add greater weight to the character. Having the "weight of the world" on his shoulders can be shown physically.
Once the ideas of EMOTION and WEIGHT are thought out we add STRONG POSING... which means THUMBNAILS!
To better understand the movement...let's begin with the PRIMARY ACTION of the HIPS , LEGS and FEET.
The first pose is the CONTACT position. Feel free to indicate the hips and to designate the left foot and the right foot. Note: The HEEL of the LEFT foot and the TOE of the RIGHT foot make contact. The CONTACT postion measures of the stride. The left and right feet are in different places on the plane.

The next KEY POSE is the RECOIL pose. It works best as the very next drawing of the walk. It is usually the LOWEST pose in the movement. RECOIL pose shows a lot of WEIGHT and IMPACT....especially when it follows the CONTACT pose.

Note: During as normal walk, Go from the CONTACT to the RECOIL in one drawing - no inbetweens or it will look mushy Notice the SQUASH (WEIGHT) of the foot...

The next pose of the walk is the PASSING POSITION; where one leg passes the other as it advances forward. The PASSING POSITION or POSE can be the highest point of the walk. NOTE: The right hip has rotated upward in an arc.

IT IS VERY IMPORTANT TO MAKE THE KNEE OF THE PASSING LEG "READ"!!!
ALWAYS draw a good "READABLE" SILHOUETTE Generally, the PASSING POSE shows the MOST WEIGHT of all the drawings in a walk. Remember, the leg moving forward has separate ARCS for the HIPS, KNEES, ANKLES and TOES.

As the leg come forward...you can bring the FOOT forward in one of these two ways.

The next KEY POSE of the walk is just the reverse of the first CONTACT POSE.
Once the PRIMARY action is KEYED OUT; pencil test the KEYS and check out the movements and timing. Try these timings:
NOTE: The six frames and eight frames indicate the key pose plus two or three inbetween drawings.
ANOTHER NOTE: Between the CONTACT position and the PASSING postion the character will be ON BALANCE. Between the PASSING position and the next CONTACT drawing the character will be OFF BALANCE. If the character is walking across the fram, the CONTACT measure the length of the STRIDE - the placement of the toes and heels are important.

Once the PRIMARY action is tested - we can add the torso, a SECONDARY action. Avoid having the torso be too "straight up". The character will become stiff. Lean the torso slightly forward.

During the RECOIL position, bring the torso forward.

During the PASSING position, you have two options for the torso and spine. REVERSING the spine (a BODY REVERSAL) when the leg extends makes for a more fluid movement. (NOTE: We will cover BODY REVERSALS more in another lesson.)

Next, we add the character's head, another SECONDARY action...
NOTE: You can use OPPOSITE actions to create greater flexibility of the head and neck. 
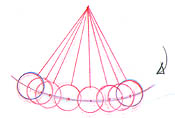
The last phase of the walk is the SECONDARY action of the arm swing. The arm swing is like a pendulum. The movement is motivated by the SHOULDER....NOT the hand!

The shoulders move opposite the hips. When the left arm is forward the left leg is back. When the right arm is back the right leg is forward.

NOTE: a Nice OVERLAPPING ACTION can occur by having the arm swing be at it's extreme positon during the "RECOIL" position and not the CONTACT position. Generally, the arm slows in and out at either end of each swing. Don't forget too add the inbetweens and then pencil test.

ANTICIPATION

ANTICIPATION is an important principle in animation.. It is one of several devices in animation derived from the genre of theater. Anticipations or "Antics" precede most of the main movements in a scene. Most of the time the anticipation is an action opposite to the main action. Anticipation pertains to movements by humans, animals, objects, effects and graphics. Anything you can animate can begin with as anticipation.

Anticipations have several purposes:
  • They set up or telegraph your audience and let them know something is about to happen.
  • They keep the audience with the character's actions.
  • It helps the character, animal, object, effect or graphic build momentum.
  • Most of the time, the anticipation matches the action. Big anticipation-big action; small anticipation small action.
STEP 1
--------

Say you want to animate a character who jumps UP; the character mustfirst "antic" DOWN.

Take a look at the bouncing ball to illustrate an anticipation.

As you can see in key drawing #1 - the ball in it's normal round shape.

In drawing #2 - we "antic" down. In this instance, we draw a squashed ball shape to show the weight of the character.

TIP: Animate in an opposite direction in most anticipations.

Follow with drawing #3, a stretched ball shape as the character jumps into the air. In key pose drawing #4 the character resumes it normal round shape.

Not all anticipations use squash.. 


STEP 2
--------


Here we have a character grab a cup in four key drawings. In drawing #1, the character is at rest. Drawing #2 depicts an opposite action, as the character raises his hand. The next drawing, #3, the character presents his hand as he moves to grab the cup. Finally, in drawing # 4, the character has made contact with the cup.


TIP: ALWAYS look for good silhouettes in your key poses.

Spread the fingers as they near the cup.
To increase the impact or contact, go from the open position (with the fingers spread) to the closed or contact position (with the hand around the cup).


STEP 3
--------


Here's another example of an anticipation before a walk:


Again, in drawing #1, the character is at rest. Drawing #2, the young lady does a not-so-subtle anticipation. Then in drawing #3, she steps off.

Remember to follow the arcs when the key poses are inbetweened.


KEY POINTS
  • USES FOR ANTICIPATIONS
  • SET UP or TELEGRAPH the audience (a theater device).
  • KEEP the audience with the character's actions.
  • Builds MOMENTUM for the main action.
  • The anticipation MATCHES the action.


TIPS
  • Look for OPPOSITE ACTIONS to use for anticipations.
  • ALWAYS look for good SILHOUETTES in the key drawings.
  • Remember to FOLLOW THE ARCS when the key poses are in betweened.
  • For the most part, BIG ANTICIPATION - BIG ACTION....SMALL ANTICIPATION - SMALL ACTION.


FURTHER ADVENTURES FROM THE BOUNCING BALL

STEP 1
----------
We see the rubber ball SQUASH and STRETCH. Now squash and stretch other basic shapes such as squares and triangles.
TIP: Always try to maintain the volume, i.e., the area within a form.

STEP 2
-------

Let's have some more fun using SQUASH and STRETCH with more developed figures. The ball and the cube go from normal to squash then stretch, but you can also go from normal to stretch then squash, as shown in the car example below.
TIP: Work ruff with basic shapes. The add the details last. The details, i.e., mouth, nose eyes, squash and stretch too.

STEP 3
-------


Timing is important. Keep in mind the movement of a pendulum. It does a SLOW-IN and SLOW-OUT at the beginning and end of each swing.
NOTE: The PATH OF ACTION of the pendulum is an ARC. The same movement applies to the swinging door below.
Slo-in & Slo-out
TIP: Try to avoid the "middle" position of the arc. Strong verticals stop the action or become neutral.
Now apply this information to a simple action such as a swinging door. Play the door to one side of the middle position or the other. Use arcs, set your tic marks, and avoid the middle position. Begin movement with a SLOW-IN and end with a SLOW-OUT.
TIP: In the case of a slamming door, you will have a SLOW-IN but no SLOW-OUT. This is because a slammed door stops abruptly. Actions will always begin with a SLOW-IN unless an object enters the frame already AT SPEED (in motion). 

 STEP 4
--------


SQUASH is a great way to show the object's or character's weight. Note the weight in the feet above. The heavier the character, the more squashed the feet will look.
The weight (or squash) is based on on three elements:
  • The substance of the object or character -- is is rubber, metal, flesh, what?
  • The speed at which it travels and its impact.
  • The actual weight of the object.
TIP: Start with simple shapes and add to them. Details are added last, as shown above with the face.
Here's one more thing to ponder as you create your simple animation. Facial movements during dialogue will SQUASH and STRETCH according to the movements of the jaw and the muscles in the cheeks.

KEY POINTS
  • SQUASH and STRETCH can be applied to all objects and characters.
  • The weight (or squash) is based on on three elements:
    • The substance of the object or character -- is is rubber, metal, flesh, what?
    • The speed at which it travels and its impact.
    • The actual weight of the object.

TIPS
  • Always try to maintain the volumes.
  • Work "ruff" with basic shapes, adding the details last.
  • When moving an object or character in an arc, avoid the middle position -- play it to one side or the other.

BOUNCING BALL

The bouncing ball includes many aspects of animation that an animator uses everyday in every scene on which he works. Animation principles such as the path of action, arcs, momentum, timing, key drawings, inbetween drawings, weight, speed, and the substance of an object are included in this simple exercise.

STEP 1

 
Let's begin by drawing a path of action from left to right. This is the path the ball will follow. Remember to stay "ruff" and "loose" with your drawings. As is the case with most animation, our path of action is made up of ARCS.
TIP: Most objects, characters, etc. move in ARCS and NOT in straight lines.


STEP 2


Next we will plan the timing of the ball along our path of action. Draw tick marks. This will help us figure out the positions (on the arc) of the ball and the timing of the bounce. Tick marks at the beginning (the top of the arc) are close together; as the ball heads down, the tick marks become further and further apart.


The action at the beginning of an arc is called a "slo-in". Once the ball hits - it looses a little momentum and then slows down (slo-out) as it approaches the top of the next arc.
TIP: Think of a ball rolling down a hill. It gains speed. Now we have created a guide for our timing.

STEP 3


We "ruff" in our key drawings. Key drawings (or key poses) are at the beginning and at the end, and wherever the character, object, etc. changes direction. Our key drawings are #1, #7, and #13.
NOTE: Drawing #7 is where the ball makes contact, or impacts with the ground. #7 is the "squash" drawing, i.e., where we show the illusion of weight or impact of the object (3a).
TIP: The illusion of weight is very important. To maintain the integrity of the ball, be sure to maintain the same volume in drawing #7 (even though it is "squashed") as you have in drawings #1 and 13. Also, the faster the object, character, etc. moves, the more "squash" you have when it hits.


STEP 4


Next we add the breakdown drawings (#6 and #8). "Breakdowns" are really inbetween drawings which help describe the action. These drawings (known as "inbetweens" or "tweens") are the drawings between the pose or key drawings. In the hiarchy of animation, first you do the key drawings (or keys), next the breakdowns, and finally any further inbetween drawings needed to smooth out the action. The breakdowns for the bouncing ball show the illusion of speed. These are the "stretch" drawings. The stretch(speed) and squash(weight) drawings are relative to each other. Generally, if you have a lot of squash, you have a lot of stretch, too.
TIP: Notice that the ball goes from stretch directly to squash and back to stretch (# 6, #7, #8) with no "transition drawings". This gives snap to the ball's bounce.


STEP 5


Finally, we draw in the rest of the inbetweens - #2 to #5; and #9 to #12. Notice that as the ball falls, the shape "transitions" from a round ball to more and more of an eliptical or stretched shape.

As the ball bounces up, it "transitions" from the stretched shape back to the round shape. There you have it -- the plan for a bouncing ball. Of course, each individual drawing would be placed on a separate piece of animation bond (paper).

KEY POINTS
  • Start with a PATH OF ACTION.
  • Plan your TIMING with tick marks on the PATH OF ACTION.
  • Ruff in the key drawings.
  • Use SQUASHED drawings to create the illusion of weight, contact.
  • Use STRETCHED drawings to create the illusion of speed.
  • Do your key drawings (or key poses) first, then do the breakdowns and finally the inbetweens.
  • SLO-IN (transition drawings)builds momentum.
  • SLO-OUT (transition drawings)reduces momentum
TIPS
  • Most objects, characters, etc. move in ARCS and NOT in straight lines.
  • If something moves slowly, the tick marks are close together; if it moves quickly, the marks are further apart.
  • Whether you squash or stretch, a drawing ALWAYS keep the volumes consistent from shape to shape.
  • Always TRANSITION the round drawing into the stretched drawing.
  • No transitions from stretch to squash to stretch


" TIMING "

TIMING is the essence of everything we do in animation. How slow or how fast an object or character moves helps define that object or character.

In film animation there are 24 frames in each second (24x's or 24fps).

Full animation requires 12 to 24 drawings per second to achieve believable action or movement.

If each drawing is photographed once (as in 24 drawings in a second) - it is called one's. If each drawing is photographed twice (as in 12 drawings in a second) - it is called two's.

Dialog is a usually a mixture of one's and two's.

In the case of limited animation substantially less drawings are used per second.

I have also seen where a squat character design is shot on three's during walks movements.

A hold is when the animation camera shoots one drawing for a number frames. Usually 6 frames is considered the shortest amount of screen time for a hold or a moving hold to register. Though some actions, such as eye blinks have different timings.

Early in my career, I met Bill Littlejohn, a master animator. One day over breakfast I asked him what jewel of animation wisdom could he pass along to me. Bill said, "If you ever get in trouble( with a scene)...make the character blink." Sounds simple enough and yet think of the possibilities - especially as related to TIMING.

Here is the TIMING for a normal eye blink:

Note: I held the last drawing 6 x's.


Even an eye blink can take on new meaning by playing with the TIMING!

A Snap Blink!


A snap blink is meant to be very quick with no inbetweens - just open and closed and open again!

Note: the closed position of the eyes is shown at an angle because of the muscle tension of a quick close movement.

A Double blink includes two closed positions.


Next, a single blink with the emphasis on the closed position.


Remember, holds and moving holds always come at the end of an action or movement. (such as, the open and closed positions of the blink).

WEIGHT can affect the TIMING of a character or object. A heavy character moves slower (uses more drawing to move) than a lighter character.


EMOTIONS also affect the TIMING. A depressed or sad character who has the "weight of the world" on their shoulders will move slower than a happy, upbeat, or victorious character.


ENERGY is another ingredient to consider. A run-down, tired character is slower and takes longer to perform a task than when the same character is awake and vibrant and ready to go!

SPECIAL EFFECTS - Most spfx are shot on one's. Effects such as spins, explosions, etc. cover a large area on the scene in a short amount of time. To maintain the persistence of vision and insure smooth movement he effects are shot on one's.

TO RECAP 
------------

  • There are 24 x's in one second of film animation.

  • FULL animation requires 12-24 drawings a second.

  • 24 drawings photographed per second is called one's.

  • 12 drawings photographed per second is called two's.

  • A hold is when the camera shoots one drawing a number of times.

  • Holds and moving holds always occur at the end of an action or movement.

  • Most Special Effects (spfx) need to be shot on one's to insure smooth movement. 


  • HINTS  
    --------


  • Weight can effect TIMING (heavier - slower / lighter - faster).

  • Emotions effect TIMING. (burdened, sad - slower / happy, victorious - faster).

  • The same with Energy: (rundown, tired - slower / awake, vibrant - faster). 


  • Extended Preston Blair phoneme series

    phoneme_a_i

    phoneme_c_d_g_j_k_n_r_s_y_z

    phoneme_c_d_g_k_n_r_s_y_z

    phoneme_e

    phoneme_f_v

    phoneme_f_v

    phoneme_l

    phoneme_m_b_p

    phoneme_o

    phoneme_rest

    phoneme_th

    phoneme_u
    phoneme_w_q